


Hello, this is a detailed blog for Git & GitHub commands which are used by IT professionals, developers, etc.
What is Git?
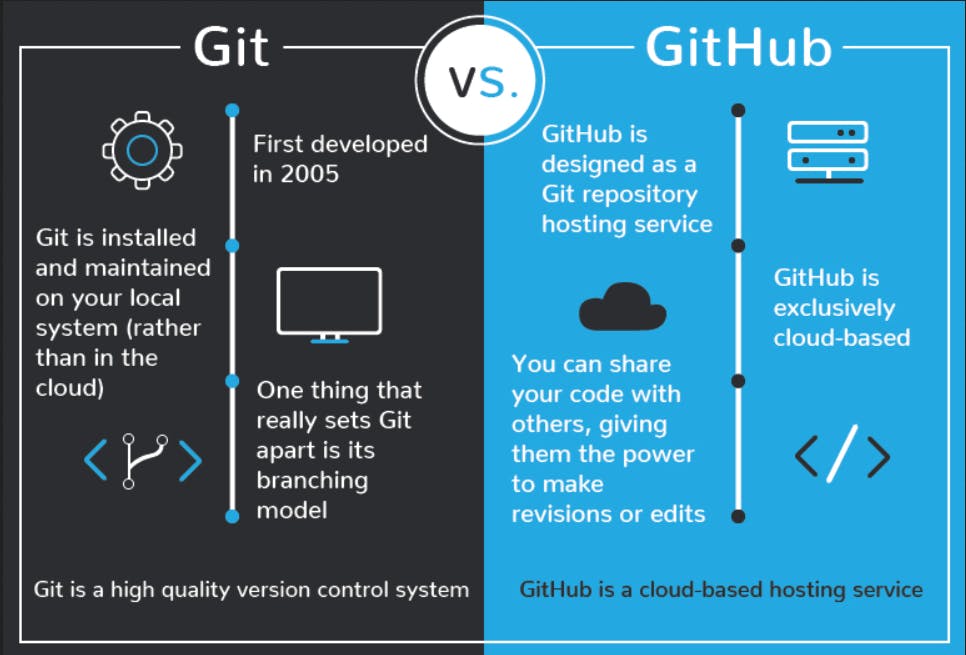
Git is a free and open-source version control system, created by Linus Torvalds in 2005. Git is widely used by developers all around the world to manage large and small-scale projects. Since it is an open-source project it is free to use. It helps us to keep track of every modification in our project. Git has been used by various organizations, businesses, professionals, and even startups to manage their code, task allocation, and project management.
What is GitHub?
GitHub is one of the most advanced development platforms in the world. It has several useful features that enable development teams to work together on the same project and easily create new versions of software without disrupting the current versions. GitHub is just a cloud-based hosting service that let you manage Git. There are many applications like Github like GitLab or BitBucket.
How to install Git
To use Git, you have to install it on your computer. To do this, you can download the latest version on the official website. You can download your operating system from the options given. To verify the installation, you can run this command on the command line: git --version. This shows you the current version installed on your PC.
Installation
Git: git-sc.com
GitHub Desktop: desktop.github.com
Git Basic Terminology
Repository(Repo): A repository is like a folder in Github. Your project's repository contains all its files such as code, documentation, images, etc. It tracks every code that anyone changes so if any error occurs we can go back to the previous version.
Branch: A branch in Git is simply a lightweight movable pointer to one of these commits. The default branch name in Git is "main" earlier it was used to be "master".A repository can have multiple branches. While contributing to projects on Github we should never push our code to the main branch. The best practice would be to make a new branch and commit to that branch.
Checkout: The git checkout command is used to switch between branches in a repository.
Clone: git clone is a command-line utility used to target an existing repository and clone it locally.
Fork: Forking a repository allows you to freely test and debug changes without affecting the original project. It creates a copy for you on our GitHub.
Main/Master: Main/Master is the default name of a repository’s active development branch. The main/master is the primary branch of all your repositories.
Fetch: It will fetch all the new code merged from the upstream(original repository).
Stash: While working with Git, you may need to make multiple changes to files, but you may not want all changes to go in one commit. If you want to pause the changes you are working on now in favor of working on another issue or improvement, you can “stash” your changes, essentially clearing them from the staging area until the changes are called again.
Head: Git’s way of referring to the current snapshot. Internally, the git checkout command simply updates the HEAD to point to either the specified branch or commit. When it points to a branch, Git doesn't complain, but when you check out a commit, it switches into a “detached HEAD” state.
Pull Request: Pull requests are a feature that makes it easier for developers to collaborate using Bitbucket. They provide a user-friendly web interface for discussing proposed changes before integrating them into the official project.
Working Tree: The tree of actual checked-out files, normally containing the contents of the HEAD commit's tree and any local changes you've made but haven't yet committed.
Push: After you save a local copy of a repository and modify the files on your computer, you can upload the changes to GitLab. This action is known as pushing to the remote because you use the command git push.
Pull: When the remote repository changes, your local copy is behind. You can update your local copy with the new changes in the remote repository. This action is known as pulling from the remote because you use the command git pull.
Commit: Commit is used to save your changes to the local repository.
Origin: origin is the default name of a remote repository connection.
Index or Staging Area: It is the cache/place where the changes are stored before they are committed.
Merge: Merging takes the content of a source branch and integrates them with a target branch.
Merge conflicts: Merge conflicts happen when you merge branches that have competing commits and Git is unable to resolve differences between them.
Initial Configuration
git config --global user.the name "[name]": Configure user information for all local repositories. Sets the name you want to be attached to your commit transactions.git config --global user.email "[email address]": Sets the email you want to be attached to your commit transactions.git config --global color.UI auto: Enables helpful colorization of command-line output.
Create Repositories
A new repository can either be created locally, or an existing repository can be cloned. When a repository was initialized locally, you have to push it to GitHub afterward.
git init: The git init command turns an existing directory into a new Git repository inside the folder you are running this command.git remote add origin [url]: After using the git init command, link the local repository to an empty GitHub repository. It specifies the remote repository for your local repository. The URL points to a repository on GitHub.git clone [url]: Clone (download) a repository that already exists on GitHub, including all of the files, branches, and commits.
.gitignore file
Sometimes it may be a good idea to exclude files from being tracked with Git. This is typically done in a special file named .gitignore.
Branches
Branches are an important part of working with Git. Any commits you make will be made on the branch you’re currently “checked out” to. Use git status to see which branch that is.
git branch [branch-name]: Creates a new branch in the repository.git switch -c [branch-name]: Switches to the specified branch and updates the working directory.git merge [branch]: Combines the specified branch’s history into the current branch. This is usually done in pull requests but is an important Git operation.git branch -d [branch-name]: Deletes the specified branch from the repository.git branch: Lists all local branches from the repository.git branch -m [new branch name]: Rename the branch name in the repository.
Synchronization
Synchronize your local repository with the remote repository on GitHub.com/GitLab.com.
git fetch: Downloads all history from the remote-tracking branches.git merge: Combines remote-tracking branches into a current local branch.git push: Uploads all local branch commits to GitHub/GitLab.git pull: Updates your current local working branch with all new commits from the corresponding remote branch on GitHub.git pullis a combination ofgit fetchandgit merge.
Make Changes
Browse and inspect the evolution of project files.
git log: Lists version history for the current branch.git log --follow [file]: Lists version history for a file, beyond renames (works only for a single file).git diff [first-branch]...[second-branch]: Shows content differences between two branches.git show [commit]: Outputs metadata and content changes of the specified commit.git add [file]: Snapshots of the file in preparation for versioning.git add .: Snapshot all the files in preparation for versioning.git commit -m [descriptive message]: Records file snapshots permanently in the version history.git rm [file]: Remove the file from the index and working directory.git gc: Clean unnecessary files and optimize the local repository.git stash: Temporarily remove uncommitted changes and save them for later use.git stash apply: Reapply previously stashed changes.
Redo Commits
Erase mistakes and craft replacement history.
git reset [commit]: Undoes all commits after [commit], preserving changes locally.git reset --hard [commit]: Discards all history and changes back to the specified commit.
I hope you will be able to use Git/GitHub. Bookmark this page for future reference. Share this blog if you like the content.